Building a Custom Sneaker Display with LED Lighting

You'll learn how to select, install, and wire LED lighting to showcase your sneaker collection without damaging your footwear. This guide covers light temperature, heat management, and the hardware required to build a professional-grade display from scratch.
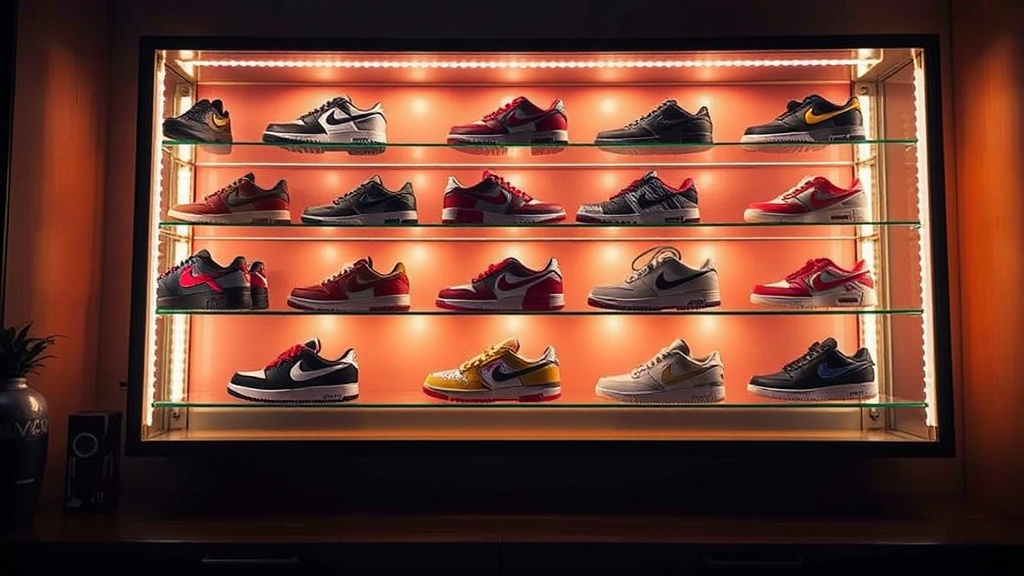
Lighting isn't just about making things visible; it's about making your grails look expensive. If you've got a pair of Jordan 1 Highs or a rare Yeezy collab sitting in a dark corner, you're doing a disservice to the design. Proper lighting draws the eye to the textures, the stitching, and the silhouette. But if you do it wrong, you'll end up with yellowed soles or heat-damaged midsoles.
What Kind of LED Lights Are Best for Sneakers?
High-CRI (Color Rendering Index) LED strips or puck lights are the best choice for sneaker displays because they provide accurate color representation without heat buildup. Most collectors want to avoid standard incandescent bulbs because they emit too much infrared radiation—heat is the enemy of rubber and leather.
When you're shopping, look for "High CRI" or "CRI 90+" labels. This ensures the color of your sneakers looks exactly like it does in real life. If you use a cheap LED strip with a low CRI, your "University Blue" Dunks might end up looking a dull, sickly gray under the light. It's a frustrating mistake to make after spending hundreds on a display case.
Here is a breakdown of common lighting options for collectors:
| Light Type | Best Use Case | Pros | Cons |
|---|---|---|---|
| LED Strips | Edge lighting for long shelves | Easy to hide, uniform light | Can look "cheap" if visible |
| LED Puck Lights | Spotlighting individual pairs | Creates dramatic shadows | Harder to wire for multiple units |
| COB LED Strips | High-end custom builds | No visible "dots," smooth glow | More expensive |
| Smart RGBIC | Mood lighting/Themed displays | Change colors via phone | Can distract from the shoes |
If you're building a large-scale wall, I'd suggest looking into COB (Chip on Board) LED strips. Unlike the standard LED strips where you see individual tiny dots of light, COB strips provide a continuous, seamless beam of light. It looks much more professional and avoids that "cheap gaming setup" vibe.
How Do I Prevent Heat Damage to My Sneakers?
You prevent heat damage by using low-voltage LED systems and ensuring there is adequate airflow within your display case. Heat is the primary reason why many collectors see "yellowing" or "oxidation" on their soles. Even though LEDs run cool, they still generate some heat, and in a closed acrylic case, that heat can accumulate.
The rule of thumb is to keep your lights away from the direct contact points of the shoe. If you're using a display case, make sure it isn't an airtight seal if you're using high-intensity lights. Air circulation is vital. If you've ever wondered why some people use silica gel packets, it's not just for moisture—it's part of a larger battle against environmental degradation. While silica helps with humidity, heat is a different beast entirely.
Check out my previous post on preventing sneaker odor; while that focuses on moisture, the principles of environmental control are similar. You want a stable environment, not a fluctuating one.
One thing to watch out for: never use "warm white" incandescent bulbs. They are far too hot for any long-term display. Stick to 12V or 24V LED systems. These are much safer for your collection and provide a consistent power draw.
How Much Does a Custom LED Sneaker Display Cost?
A custom LED sneaker display typically costs between $50 and $300 depending on whether you are DIY-ing a single shelf or building a full-scale wall unit. The price fluctuates based on the complexity of the wiring and the quality of the light strips you choose.
Let's look at three different tiers of builds:
- The Entry Level ($50 - $100): This usually involves buying pre-made acrylic shelves and sticking battery-powered LED puck lights or cheap USB-powered strips to the underside. It works, but the wiring is often messy and visible.
- The Mid-Tier ($150 - $400): This is where most serious collectors live. You're buying high-quality aluminum channels to hide your LED strips. This keeps the light diffused and makes the installation look "built-in" rather than "tacked on."
- The Pro Tier ($500+): This involves custom-built cabinetry, integrated smart home-controlled lighting (like Philips Hue), and high-CRI COB strips. This is for people who want their sneaker room to look like a high-end boutique.
It's worth noting that the aluminum channels are the secret weapon here. They act as a heat sink—which helps pull heat away from the LEDs—and they provide a clean edge for the light to sit in. If you just stick a strip of tape to a shelf, it looks amateur. If you nestle it in a channel, it looks like a museum piece.
If you're worried about the structural integrity of your display, you might want to look at the specifications for acrylic sheets. Thicker acrylic is better for heavy-duty shelving, especially if you're displaying high-top basketball shoes or heavy-duty boots.
What is the Best Way to Wire My Display?
The most efficient way to wire a display is to use a centralized power supply with a DC transformer to ensure consistent voltage across all light segments. You don't want to be running a dozen different power cords for every single shelf—that's a nightmare for cable management.
I recommend using a "daisy chain" method or a parallel wiring setup. In a parallel setup, each light strip gets its own connection to a main power line. This is better because if one light fails, the rest of your display stays lit. If you wire them in a series (daisy chain), one bad connection can kill the whole line.
Here is a quick checklist for your wiring build:
- Use a dedicated power supply: Don't just rely on a USB port from a laptop; it won't have enough amperage to power a long run of lights.
- Hide your wires: Use adhesive wire clips or even small pieces of black electrical tape to run wires along the back edges of your shelves.
- Test the voltage: Before you glue or screw anything down, test your connections. There's nothing worse than finishing a build and realizing the bottom shelf is dark.
- Consider a dimmer: A dimmer allows you to adjust the intensity. Sometimes a bright light is too much, and you want a subtle glow for a "night mode."
If you're just starting out, you might want to check out selecting the right display case before you start drilling holes for wires. You need to know the dimensions of your space and how much room you have for the electrical components.
One thing to keep in mind: if you're building a large wall, the weight of the wiring and the power bricks can get heavy. Make sure your mounting system is solid. I've seen people build beautiful displays only to have the whole thing sag because they didn't account for the weight of the hardware.
A lot of people forget that even "low heat" LEDs generate some warmth. If you're building a tight-fitting box, the air trapped inside can get quite warm over a few hours. A small, silent computer fan tucked in the back corner can solve this, but honestly, most people find that high-quality LED strips are plenty cool for standard indoor displays.
If you're looking to make your collection even more professional, you might eventually want to look into essential display cases that come with integrated lighting features. It's a simpler way to start, but building your own gives you total control over the aesthetic.
The goal is to create a centerpiece. Whether you're showing off a vintage pair of Air Max or a modern collab, the lighting is what tells the viewer that these aren't just shoes—they're art.
Steps
- 1
Plan Your Light Placement
- 2
Choose the Right Color Temperature
- 3
Install LED Strips Safely
- 4
Test for Heat and Light Bleed